

After the jump, we'll go step by step from start to end of purchasing a ticket on RZD, complete with pictures at every step.
Part 1: Setup your computer and RZD account
Step 1: Download and install Google Chrome. Chrome has a feature that you will want: Auto-translate of webpages. This is the singular most important thing you can do to make this easier. If it ever does not automatically translate Russian to English, right-click on the page and select "Translate to English" and it will.

Step 2: Go to this link and click Регистрация.That will take you to registration screen.
Step 3: You'll need to sign up for an account on RZD. You don't need to enter real info for the account (although I'm sure they would like you to), but your email has to be verifiable. You'll need to do this to access and buy your tickets. If the page is not accepting your registration for some reason, you should open a second browser (FireFox, Internet Explorer) in addition to Chrome and use the untranslated page in the other browser. On a couple of the pages, RZD does not like translated pages and this is sometimes one of them. Just flip back and forth between the two to know which field is which. Confirm your account and you're ready to roll.

Step 4: Before you start searching for ticket, use Google Translate to translate all of the names of the cities you want to visit and copy each one into a text document (You can use notepad for this). RZD expects your entries to be in Russian. For example, typing "Irkutsk" will not work. It needs to be "Иркутск". This will help save you time in the long run.

Part 2: Buying a ticket
Step 1: Use this link for buying tickets on RZD, as before, and sign in.

Step 2: It is best not to translate this page or the next page. You'll now be on the main screen. It's a pretty simple set up: From on the left, To on the right, What date, and between what time to search. Enter the names of the city pairs in cyrillic (see step 4 of the create your account section) you want to buy a ticket for in the two boxes, then the date that you want to select, and then between what times. The times are in military time. Be aware that some trains only run on odd or even days, and others might only run once a week. A great source of information on this is over at The Man in Seat 61's webpage, plus guide books are reasonably accurate.

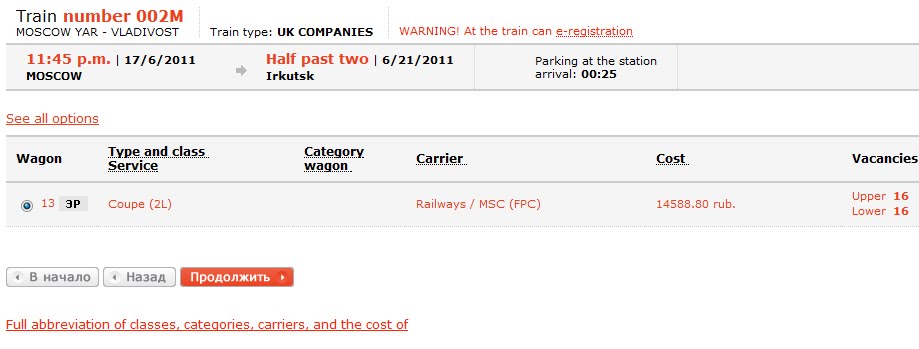
Step 2.1: We're going to buy a ticket between Moscow and Irkutsk as an example.


On the right, you see the price in rubles and how many spots in each class are open (this will be in English usually, but I forgot to do it here). Departure AND arrival times are always Moscow time. The #44, for example (the first train) looks attractive and looks like it will get in early afternoon, but it will actually get to Irkutsk at 7:40pm because there's a five hour difference between Moscow and Irkutsk.


Step 5.1: There's a great layout of the trains over at this website, but the best cabins are in the middle, then front (low numbers), then in the rear (high numbers). The rear of the train is where smokers go to smoke, where the bathrooms are, and where the trash is. Avoid it if you can.
UPDATE: When this was written, they were still upgrading the system, but now the system allows you to interactively select where you want to be, along with the map of the train car with which spaces are available. Click on the button that says, "схема вагон", and an interactive selector will appear. Spaces which are not available and have been booked by other people will be dark grey (for example, 37-38 here), while available places will be light. If some cabins are gender segregated, red is for an available space for women and blue for men The new version looks like this:
 |
| ...and now with the fully implemented seat selector! |
Step 5.2: Next up, personal information. For ID, you'll want to use a "Foreign Instrument" (Your passport). Once you enter enough information, it'll turn green. Note: Passport information must match your real passport.


I would recommend doing the electronic registration, if it's available. If your ticket is registered electronically, you can go straight to the train and board with the print out and your passport. If you do not, you will need to pick up tickets at the service center which in some stations does close. Registering electronically also does not prevent you from picking up paper tickets at the station later, which make nice souvenirs.


Was this useful? Share it! Was it really useful? Consider donating to my other project, Kindlefish!
No comments:
Post a Comment